PHOTOGRAPHY BASICS: THE HISTOGRAM
July 26, 2013
 A histogram provides photographers with information about exposure, which in turn can help identify where corrections need to be made to get the “perfect” shot. Understanding how to read the histogram and make corrections will give you an additional tool to ensure that your photos come out as perfectly exposed as possible.
What is it?
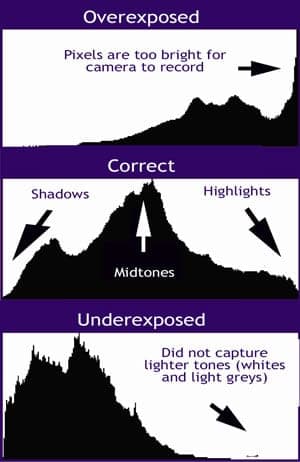
In basic terms, the histogram is a bar graph, one that shows you the tones in your image, from black on the left to white on the right. When a bar appears in any of the 256 columns (representing the levels of dark to bright your camera can capture) this means that there is “information” in your image that corresponds to that tone.
Why use it?
If you’ve ever encountered the frustration of coming home and finding out that your images are too dark or too bright, then you need the histogram. By learning to read the graph you’ll be able to tell if there are areas of your image that are over or underexposed and can adjust your camera’s settings to “shift” the exposure to ensure an overall well-rounded image.

Reading the Histogram
The column on the far left represents pixels of pure black (the darkest areas), while on the far right you’ll see information for pixels of pure white (the brightest areas). In the middle you’ll see pixel information for all the tones recorded in between.
So (here’s the important part) if there are a lot of pixels recorded (a column, or spike) in the very left or right columns of your histogram you may have an under or overexposed image.
Correcting Overexposure
When your histogram has information in the far right column (pure white) you may have blown-out highlights in your image, very bright areas with no detail. In this case you would try to “shift to the left” – a term describing adjusting your camera settings for a darker exposure so the information on your histogram shifts away from the brightest columns.
Avoiding Underexposure
The histogram data also indicates when an image may be underexposed. The pure black column on the far left indicates “clipping” – dark black shadows with no detail. You can correct this issue by changing your settings for a lighter exposure which shifts the histogram to the right and lightens up the scene.
Exceptions to Under/Overexposure
Low key and high key photography tend to eschew these rules of histogram adjustment as they are going for pure black or white overall, but in general the histogram will help you create more balanced exposures – particularly on bright days where it may be difficult to view your LCD screen. Give it a try!